Downloading to an iOS version that is stopped singing by Apple is impossible. You can still flash it through iTunes, but you will not be able activate your iPhone. If you are an advanced user, you will usually create SHSH blobs and then save it so that you can downgrade to lower version.
While iPhone 5S no longer receives updates from Apple and it stops at iOS 12.4.1, but this version causes laggy issue and slow performance on the phone. However everything can be solved now when iPhone 5S can be downgraded to iOS 10.3.3. Any of you here is still using iPhone 5S. If you want to experience the smoothies of iOS 10, you can now downgrade your phone to iOS 10.3.3. I am not cheating since I have successfully downgraded my old iPhone 5S that was running on iOS 12.2 version back to iOS 10.3.3.
This guide will show you detailed steps to help iPhone 5S run on iOS 10.3.3 version with the need for SHSH blobs.
Pre-requisites:
Currently this method only works with Mac computers. Those who are using Windows, you cannot downgrade your iPhone 5S.
Folder Futurerestore:
– file ipsw mod
– File Futurerestore patched
– Two files: IBSS and IBEC modded above
– builemanifest mod ota
– Mav7Mav8-7.60.00.Release.bbfw
– sep-firmware.n51.RELEASE.im4p (iPhone6,1)
– or sep-firmware.n53.RELEASE.im4p (iPhone6,2)
– igetnonce
– irecovery
– tsschecker
Folder IPWNDFU_Pulic
File IPWS Mod
Download Files:
- Futurerestore
Google Drive - Ipwndfu
Google Drive - IPWS Mod
Google Drive
Pass unrar: 0911436436
Once you downloaded all files, let’s start downgrading your iPhone 5S to iOS 10.3.3.
Also read: How To Downgrade From iOS 10.3.3 To iOS 8.4.1
How to Downgrade iPhone 5S to iOS 10.3.3
Method 1: Use FutureRestore
Step 1: Power your iPhone 5S off and boot it into DFU mode. Connect the phone to your Mac.
Step 2: Open Terminal on your Mac and run the following command:
./ipwndfu -p
Step 3: If your iPhone is now in ipwndfu, move on the next steps. Otherwise, repeat the steps above
Step 4: Now, continue to enter the command line below:
python rmsigchks.py
Step 5: Next, transfer IBSS and IBEC files into your iPhone by following these commands:
./irecovery -f iBSS.iphone6.RELEASE.im4p
./irecovery -f iBEC.iphone6.RELEASE.im4p
Step 6: You now need to create shsh OTA file. To do so, continue to type in the command:
./igetnonce
Terminal will show up information like iPhone6,1 or iPhone6,2 ECID ApNonce
Step 7: Copy all that information into this command:
./tsschecker -e ECID -s -o -i 9.9.10.3.3 --buildid 14G60 -d iPhone6,2 (or 6,1) --apnonce code ApNonce
Step 8: Once you have successfully created SHSH blobs, it’s time to run Futurerestore
./futurerestore -t shsh -b baseband -p buldmenifest -s sep -m buildmenifest 5S_10.3.3 mod_by_MTVP.ipsw
Method 2: Use OTA Downgrader
Step 1: Download 1033-OTA-Downgrader from here or visit github here . Once done, extract it and you will see a folder named 1033-OTA-Downgrader-master
Step 2: Check your iPhone if it is iPhone6,1 or iPhone6,2 by plugging into iTunes, click on the Serial Number until the Model Identifier shows up. iPhone6,1 will be the iPhone 5s (GSM) while iPhone6,2 (Global) is the global
Step 3: Download the IPSW iPhone 5s 10.3.3 firmware and copy it into the folder of 1033-OTA-Downgrader-master
Step 4: Open Terminal on your Mac, navigate to 1033-OTA-Downgrader-master folder by running the following command:
cd / Users / synam135 / Downloads / 1033-OTA-Downgrader-master
/ Users / synam135 / Downloads / 1033-OTA-Downgrader-master is the path to the 1033-OTA-Downgrader-master folder that you have extracted.
The fastest way is to drag the 1033-OTA folder -Downgrader-master and drop into Terminal and hit Enter (return).
Step 5: Decentralize the .sh files by running the command
chmod + x * .sh
Step 6: Install the necessary packages (during the installation process if it required password, enter the password of your Mac
./install.sh
Step 7: Create a new IPSW file by running the command
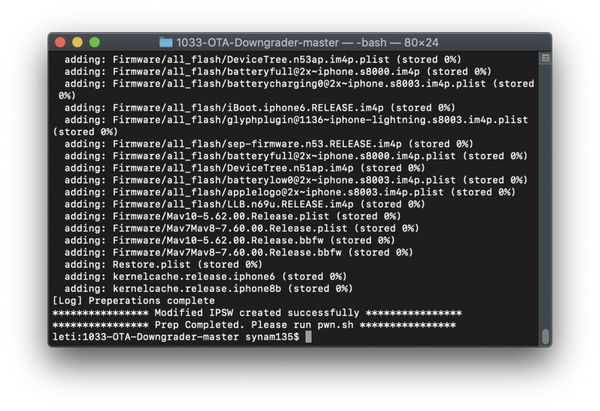
./prep.sh
The result is the screenshot below.
Step 8: Connect your iPhone 5S to your Mac and put it into DFU Restore Mode
Step 9: Exploit errors by checkm8
./pwn.sh
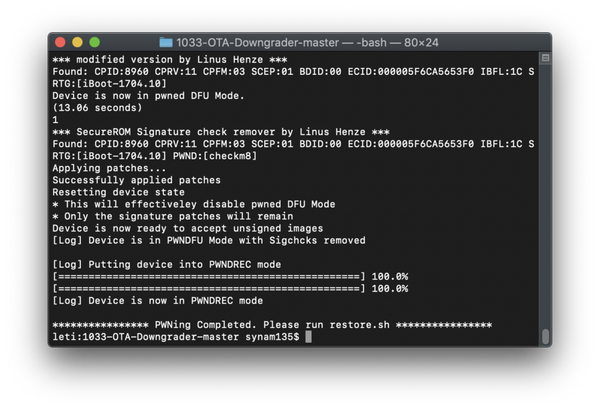
Note: The process might probably fail several times, so you need to be patient and put the device into DFU mode and try again. Personally I have to put the device into DFU mode up to 22 times =))
Step 10: Restore your iPhone to iOS 10.3.3 with the command:
./restore.sh
While running this command, the script will ask which device you are using? iPhone6,1 or iPhone6,2. type it into Terminal
The script will then ask if you want to save OTA SHSH or not. Simply press the N key and hit Enter.
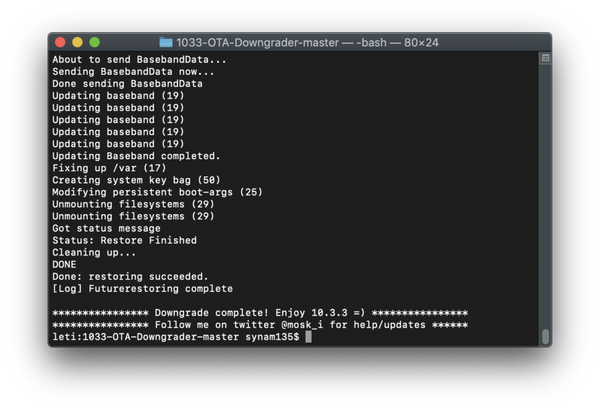
Wait for Terminal to notify DONE! It means that you have finally downgrade your iPhone 5S to iOS 10.3.3 even when Apple stops signing this version. However, you should note that this method is for advanced users. If you do have knowledge about command lines, you should not try this. If you have any question, let’s know in the comment below.