
Rooting an Android device is not something new as it has been out there for years. Basically, rooting gives you the freedom to do everything you want with your smartphone, but it also comes with risks.
Normally, you will lose root access when updating to new OS software, but thanks to Magisk, your device remains rooted even if you update to Android 11. However, the tool is still in the early stage, so it may come with glitches and errors that may brick your phone.
If you are interested in testing out the tool software, then I will show you how in the section below. However, keep in mind that rooting has a lot of restrictions. For instance, you won’t be able to purchase online using your credit card or debit card, or some apps won’t work on a rooted device.
How to Root Android 11 using Magisk
Unlock the bootloader
The first thing you need to do is to unlock your device’s bootloader. This is an important step as it allows the rooting tool to access the OS-level partition of your device. Keep in mind that unlocking the bootloader will erase all data and files in your internal storage, so make sure you already have a backup.
You can check out my detailed guide on how to unlock the bootloader on an Android device. Unlocking the bootloader may brick your device, so make sure you follow all of my steps.
Download and Extract the Android 11 Factory Images
Factory images are assigned to every firmware, allowing you to reset your firmware to its fresh state when something goes wrong. To download the factory image for the Android 11 your device is running, you need to head over to your manufacturer’s website.
Some OEMs offer direct downloads for factory images, which is much faster. However, if you cannot find the link, you can get the link from here for Nexus and Pixel devices.

Once you have the file downloaded, extract it. To do this, you are going to need a Windows computer or a Mac. Unzip the file, then open the folder, and extract the boot file. After that, drag and drop it into your desktop. When you are done, move the unzipped boot image to your phone using the USB cable.
Download and Install Magisk Manager Canary on your Android phone
Now, you need to install Magisk Manager Canary on your phone. To download it, head over to this link by topjohnwu. This is the pre-beta build of Magisk Manager that supports rooting Android 11, so make sure you download the right version for your phone.
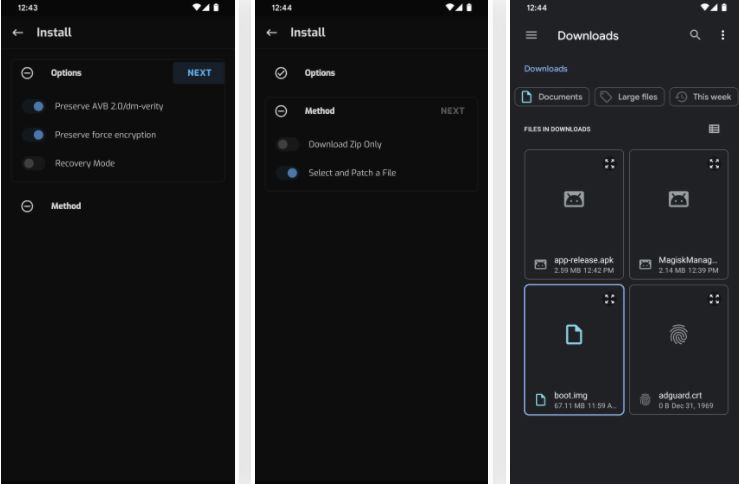
Once you have it installed, open it and hit Install in the top right corner. After that, tap Allow to give Magisk permission to access your files and you will be moved to the Install screen. From here, enable two Preserve options and disable the Recovery mode option. Now press Next. Under the Method section, Tap Select and Patch a File and select the boot image file you downloaded earlier. Back in the Install screen, hit Next, and proceed by tapping “Let’s Go“.
Now, transfer the patched boot image file from your phone to your desktop using the USB cable.
Setup Google’s Platform-Tools on your PC
To enter the commands to root your device, you need Google’s Platform-Tools. Once the download is finished, open the file, then extract it, and copy and paste it to the desktop.
Now, open the Platform-tools folder, and open the command prompt window. After that, type “cd” and hit the Spacebar (don’t press Enter). Now, drag the Platform-tools folder from the desktop and drop it into the command prompt window, and press Enter.
Put Your Phone into Bootloader
To do this, open Settings > Developer options > Enable USB debugging. This step allows you to send commands from your computer to your Android device.
On your PC, enter the following command adb reboot-bootloader (make sure your phone is now connected to your PC using a USB cable). Your phone will reboot into bootloader mode.
Flash the patched boot image
Type the following command to make sure your device has been recognized by your system: fastboot devices.

Now, enter the following command: fastboot flash boot and drag the patched_magisk.img file from the explorer file into the command window and hit Enter. Once you are done, type fastboot reboot to reboot your Android.
To make sure your device has been rooted, open the Magisk Manager app and you should see the Status as Normal.
Got any questions? Don’t forget to leave a comment below.