
This year Samsung released the Galaxy S20 series, which happens to be a worthy upgrade over last year’s Samsung Galaxy S10 Series. The new series brings powerful features such as a Snapdragon 865 / Exynos 990 processor, 120Hz refresh rate, up to 45W fast charge, 5G connection, and lots more. However, despite all these powerful features, you may still want to tweak different settings that are not available by default. Of course, you will need to root your new phone in order to do that. Although there are rumors that rooting this series is very difficult or nearly impossible, it’s in fact quite simple. In this article, we will guide you on how to root the Samsung Galaxy S20 Series.
Why You Need To Root Your Samsung Galaxy S20
(If you have rooted your android phones before, skip this part. If you are new to Android phones and this is the first time you root a phone, you should read it )
Rooting Android devices is quite populars and it has been out for years. This includes the S version of Samsung phones. Rooting your Android phone will grant you further management, more customization, RAM distribution, and especially the applications made for rooted devices.
The Rooting Method We Will Use
Like other Android devices, the S20 series can also be rooted using the Magisk tool through the bootloader. This will work on As this method needs the bootloader unlocked, you can only do it on the S20 devices that are powered by the Exynos chip. Unfortunately the Snapdragon counterpart does not support unlocking the bootloader. So you should check your devices model number/information to make sure it is able to be rooted. On the other hand, rooting your devices also comes with the risks of bricked phones or void warranty. Therefore, you must be thoughtful and careful if you choose to root your phone. Make sure that you follow our guide thoroughly and do not skip any steps.
Things To Prepare
There are a few things you need to get before the main process:
- Data Backup: This is very important if you want to get all the stored data and setting back after you root your phone. Make sure that you’ve created a full backup of your files
- A computer with 7zip/Winrar and Android USB driver installed
- Odin 3.14.4 or newer on your PC
- The Stock Firmware of your Samsung Galaxy S20 Series phone: You need to download the correct firmware for your model. We recommend you get it by using the SamFirm tool.
- You will need to charge your battery. Normally your phone will need at least 50% of battery to complete the rooting process. So we recommend you to charge your device to 70% before rooting in order to avoid any power-related issues.
- Magisk Manager app. You can get the apk file of this application now and install it later during the process. To download it, head over to this link by topjohnwu.
If you have all of these thing prepared, let’s head to the main steps
Main Steps Of Rooting Samsung S20 Series
The process of rooting smartphones in the Samsung Galaxy S20 series is broken into four steps. We recommend you to follow the steps in the order that they are presented below and do not skip any to avoid issues.
Step 1: Unlocking the Bootloader
Unlocking the bootloader has over the years become a norm in the procedure of rooting Samsung smartphones. This is an important step as it allows the rooting tool to access the OS-level partition of your device. Keep in mind that unlocking the bootloader will erase all data and files in your internal storage, that’s why we told you to make a backup for your data. Now to unlock the Bootloader:
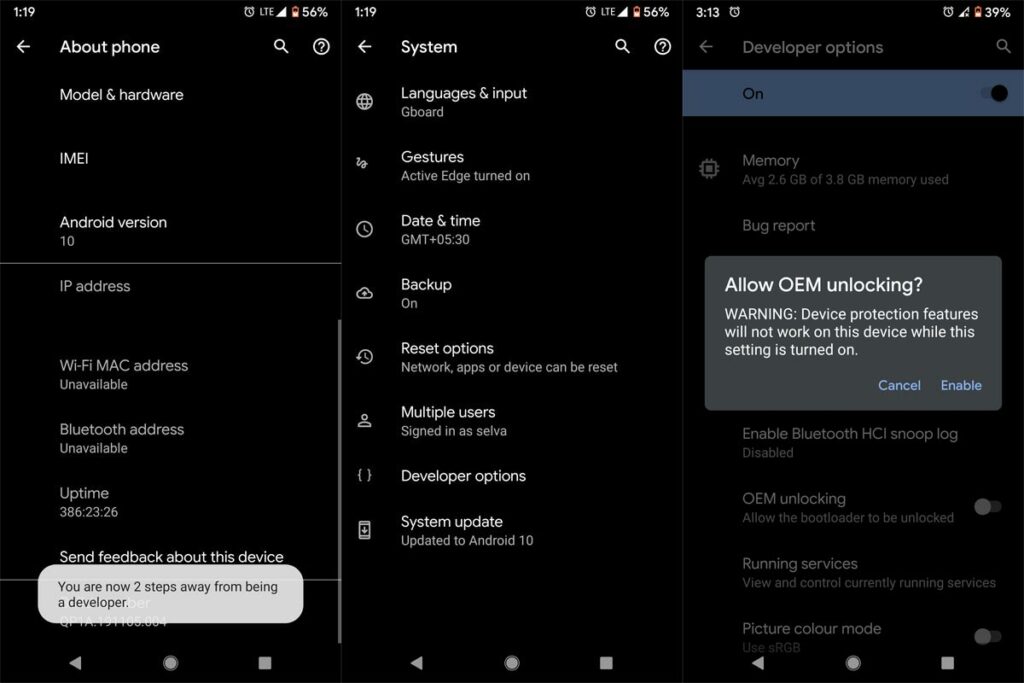
- On your phone go to Settings > About phone > Software information
- Scroll down and tap on Build number 5 times (or maybe more). Doing this will turn on your phone’s developer mode.
- Go back to Settings and you will see the new Developer option section
- Open developers option
- Look for OEM unlocking and enable it
- Power off your device
- Hold the volume up and down button together and plug in a USB Cable. This will start the download mode on your phone.
- Press and hold the Volume Up button will move you to the Device unlock mode where you can unlock the Bootloader
- Follow the instructions on your screen and let your phone reboot.
Step 2: Patching The Firmware File
Now we move to the computer. You should have downloaded the correct firmware file for your Samsung Galaxy S20 series devices in order to prevent your smartphone from getting bricked. You can proceed to apply the steps outlined below after you might have met the aforementioned requirements.
- Extract the firmware file you downloaded
- Look for a file that starts with AP and use 7-zip to extract it in a folder
- In the extracted folder, look for the file named boot.img
- Right click it > 7-zip > Add to archive. In the Archive format box, select tar then click OK
- Now you will have a boot.img.tar file. Copy it to your device’s internal storage
- If you haven’t downloaded and installed the Magisk Manager app, you should install it now
- Launch the Magisk app and click the Install button
- On the Methods section, tap the Select and patch file
- Navigate to where you have placed the file and select it.
- Wait for Magisk manager to complete patching the file.
- Copy the outputted magisk_patched.rar file to your computer
Step 3: Flashing The Firmware File
This step involves flashing the patched file we created with Magisk. We are going to use the Odin flash tool for this task. Just so you know, Odin is the official flash tool/software for Samsung smartphones and Tablets.
Now:
- Launch the Odin tool installed on your computer
- Power off your Samsung Galaxy S20 device
- Press and hold volume up and volume down keys and then connect your device to your computer via USB to start the Download mode again
- Wait for ID: COM in the Odin tool to turn blue
- Click Options and turn off Auto Reboot
- Click on the AP button and select magisk_patched.rar
- Wait for it to load and afterward click on start
- When the progress box turns green and shows “PASS!” it means that the process is done.
- You can remove the USB cable connecting your phone and PC now
- DO NOT exit the Download mode or try to power off your phone
- Process to Step 4

Step 4: Performing a Factory Reset
Now you will need to perform a factory reset a.k.a formatting your device before you can make use of it. This is also why you need to back up your data before rooting. There’s no going back now, so let’s go to the final sequences:
- Press the Volume Down key and the side/power key to exit download mode and restart your phone.
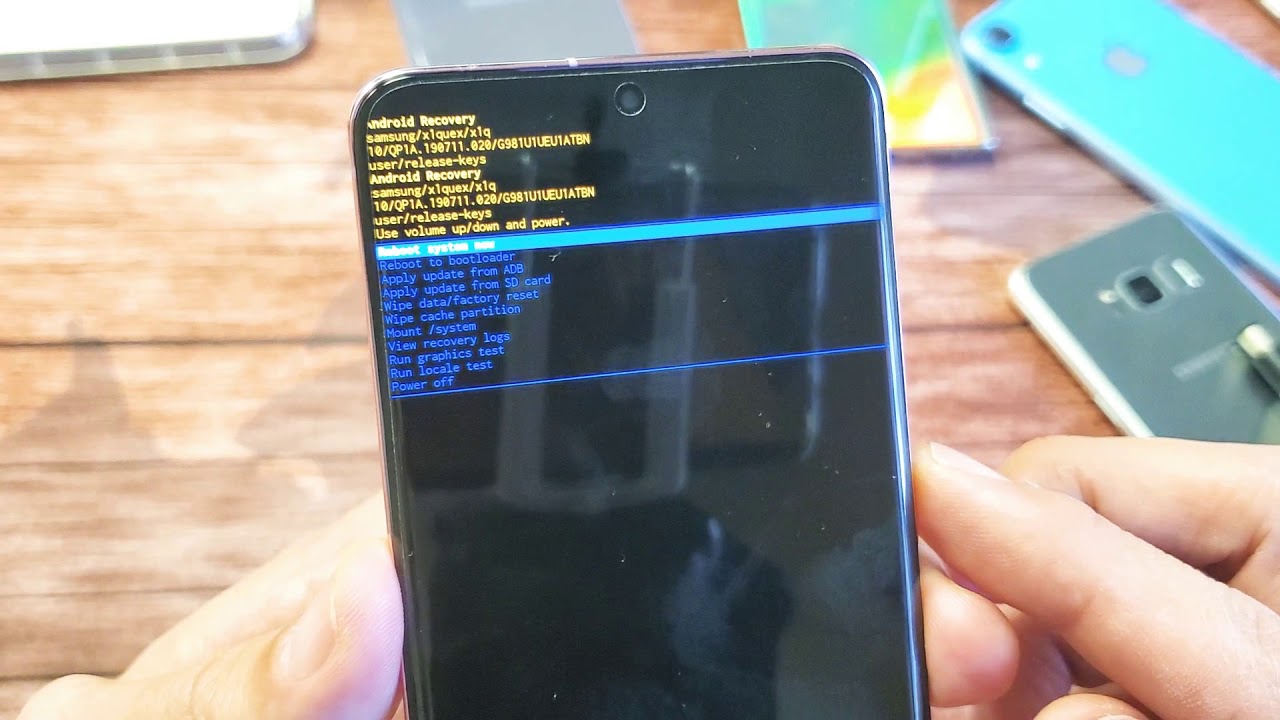
- Wait for your device to go power off and immediately press and hold Volume Up and power button. This will take you to the Recovery mode.
- Use the volume buttons to navigate to Wipe data/factory reset.
- You will see the process on the bottom left corner of the phone.
- After it shows Data wipe complete, navigate to Reboot system now.
- When your phone is booted up, quickly go through the setup wizard for the basic settings of your phone
- Now you need to install the Magisk Manager again
- Open the Magisk app and you will see a pop up for additional setup, just tap yes and let your phone reboot
You will see a red message under the samsung logo when your phone’s booting up. And there you go, after your Samsung Galaxy S20 is on again, it’s rooted!.
Wrapping Up
Now that you have successfully rooted your Samsung Galaxy S20 series smartphone, you can now do your setting tweaks, customizations, or try out rooted applications. If you have any issues with our guide, please let us know in the comments!